- My Forums
- Tiger Rant
- LSU Recruiting
- SEC Rant
- Saints Talk
- Pelicans Talk
- More Sports Board
- Winter Olympics
- Fantasy Sports
- Golf Board
- Soccer Board
- O-T Lounge
- Tech Board
- Home/Garden Board
- Outdoor Board
- Health/Fitness Board
- Movie/TV Board
- Book Board
- Music Board
- Political Talk
- Money Talk
- Fark Board
- Gaming Board
- Travel Board
- Food/Drink Board
- Ticket Exchange
- TD Help Board
Customize My Forums- View All Forums
- Show Left Links
- Topic Sort Options
- Trending Topics
- Recent Topics
- Active Topics
Started By
Message
 0
0

Posted on 8/31/23 at 2:54 pm to Elusiveporpi
quote:
but there is a guy in Raceland who is building the same boat. I think he is about to start painting the bottom. if you are in the BR area its not a far drive to go look and pick his brain. I can send his Gram handle if your interested.
What is his instagram?
Posted on 8/31/23 at 3:08 pm to CootKilla
quote:
What is his instagram?
southlousianaskiffbuild
Posted on 8/31/23 at 3:30 pm to Timmayy
quote:
Back compartment is likely going to be two hatches on either side and a middle hatch that is over the tunnel with a small livewell.
The two hatches on the side will just open into the dry bridge. The boat I looked at that last night was like this and I impressed how much storage he had and how little issue he had with water getting in there.
You may want to think about a large compartment across where you sit, and 2 smaller ones in the back. Below is my setup and the amount of stuff i can fit in the long hatch is amazing. The 2 side hatches are both insulated live wells. I use the bigger one (110 qt) for fish and ice and the smaller 45 qt for keeping smaller fish alive (bass or perch). The small center hatch holds all my valves and sea chest style bilge, which is super nice. the side compartments go all the way to the floor and drain directly thru the bottom of the hull.

Posted on 8/31/23 at 10:05 pm to Elusiveporpi
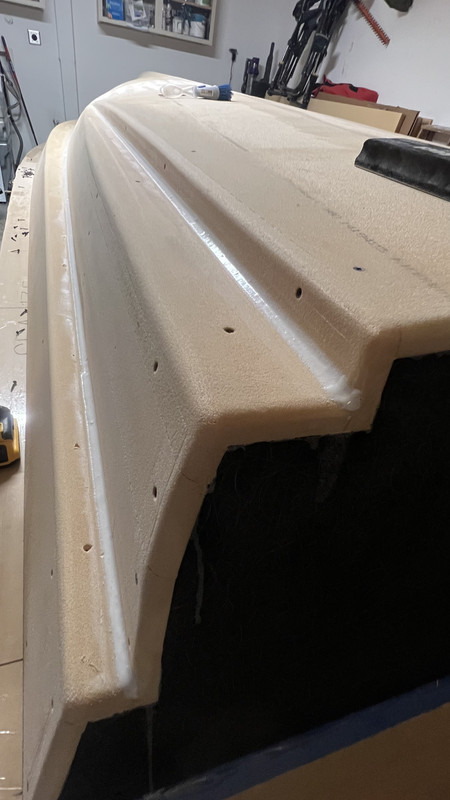
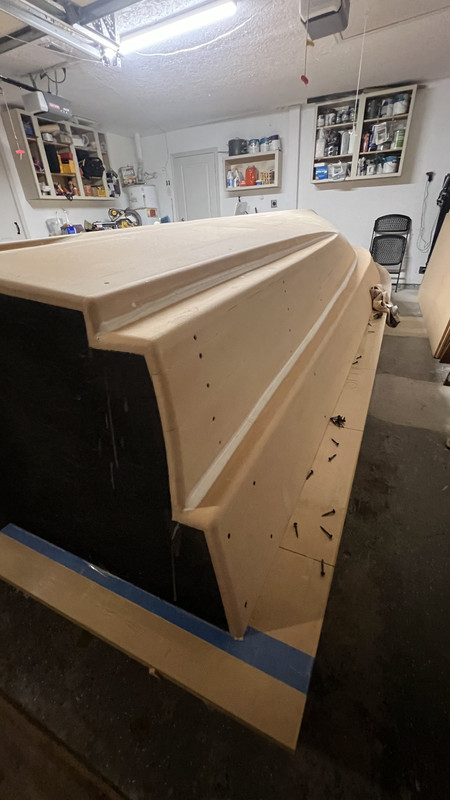
Did a bit more seam filling and got all my fillets in so that the glass will lay down in the curves and not come up from the hard 90.
I may go back and make a few of my first fillets a little wider tomorrow as I’ve never heard someone complain about them being too big only the opposite.
Honestly running out of things before it’s time to glass. Just need to put the sheer flange on.
That reminds me I need to buy a bow eye, some wax fillets and a fillet tool.
This post was edited on 8/31/23 at 10:06 pm
Posted on 8/31/23 at 10:17 pm to Timmayy
quote:
running out of things before it’s time to glass
Suck it up and get started. Tired of listening to the labor pains I wanna see the baby
Posted on 8/31/23 at 10:38 pm to DownshiftAndFloorIt
I’m trying not to have a heat stroke
Posted on 9/1/23 at 6:45 am to Timmayy
How are you going to paint it? Planning to bring it somewhere?
Posted on 9/1/23 at 9:01 am to DownshiftAndFloorIt
Idk I’m going round and round on that. Spend 3k to have someone paint it.
Spend 2k to get all the stuff and paint. To try and learn how to spray it myself and still likely end up wet sanding it and buffing to the finish I want.
Orrr and what I will likely try ti do is buy some alexseal with the rolling additive and see if I can roll it and then wet sand and buff it to the finish I’m happy with. I just need ti make sure the alexseal can be sanded and polished. Not sure if it’s like awlgrip they say that you can’t.
Posted on 9/1/23 at 9:11 am to Timmayy
quote:
2k to get all the stuff
shite man is it really that expensive? I need to do a lot of work on mine that'll result in needing to repaint the entire inside. Taking carpet out, building new console, adding a gunnel cap, redoing transom, etc etc.
I was hoping the stuff to spray it was only a few hundred bucks.
Posted on 9/1/23 at 9:53 am to DownshiftAndFloorIt
Buy a five stage hvlp setup to paint. Should be able to find one for around $750 used or $1250 is new.
I have a Fuji 3 stage and it works well, but the five stage will give even better results.
I have a Fuji 3 stage and it works well, but the five stage will give even better results.
Posted on 9/1/23 at 9:55 am to DownshiftAndFloorIt
quote:
I was hoping the stuff to spray it was only a few hundred bucks.
If you already have the compressor and gun, you should be fine, but double your expected cost.
Posted on 9/1/23 at 10:18 am to DownshiftAndFloorIt
I rolled the inside of mine after glass work in feb, two part ppg paint. Let me know if you want to see pics, looks good to me.
Why build new console? I know where a used console is that might work.
That’s a lot of sanding with a non electric board??
How much dust has crept into the house?
Why build new console? I know where a used console is that might work.
That’s a lot of sanding with a non electric board??
How much dust has crept into the house?
This post was edited on 9/1/23 at 11:25 am
Posted on 9/1/23 at 11:14 am to KemoSabe65
Yea send me some if you don't mine. Downshiftandfloorit at Gmail
My console is all Swiss cheesed up and I don't particularly like it to begin with. It's too short and there's no good way to mount the electronics where I can see them. Also got plans for a custom removable T top in the future and this one isn't going to work for that. The whole helm arrangement kinda sucks.
My console is all Swiss cheesed up and I don't particularly like it to begin with. It's too short and there's no good way to mount the electronics where I can see them. Also got plans for a custom removable T top in the future and this one isn't going to work for that. The whole helm arrangement kinda sucks.
Posted on 9/1/23 at 3:20 pm to DownshiftAndFloorIt
You can roll and tip the paint, lots of boats are painted with that method. Watch some YouTube videos.
I would wait until it’s a bit cooler if you go that route so it doesn’t flash off so fast.
I would wait until it’s a bit cooler if you go that route so it doesn’t flash off so fast.
Posted on 9/1/23 at 4:09 pm to KemoSabe65
Yea I actually was looking at those electric boards it’s like $750. But I can guarantee you it’s worth it. Idk will see if I buy one.
Trust me I want be ready for primer and paint any time soon it should be plenty cool by then. Unless it hot again by then lol
Trust me I want be ready for primer and paint any time soon it should be plenty cool by then. Unless it hot again by then lol
Posted on 9/4/23 at 4:39 pm to Timmayy
The amount of time I spend mixing thickened epoxy is mind blowing. Also the amount of epoxy that these fillets take is wayy more than I would have guessed. So far seems to be going well i decided to do the shear flange fillet before I put the shear flange mold piece in just because I figured it will be easier to sand that with it out of the way.
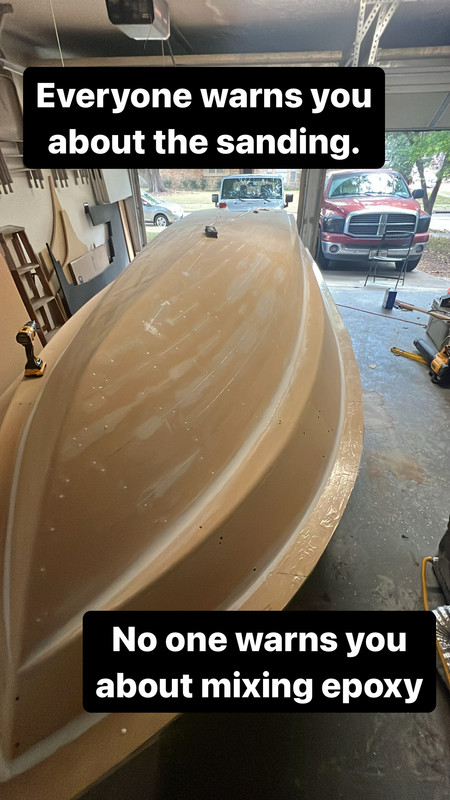
Spent about 8 more hours filling screw holes and seams and putting in fillets I really should have been able to spend 15 hours but I ended up going fishing Saturday and then watching Lsu get stomped Sunday.
Spent about 8 more hours filling screw holes and seams and putting in fillets I really should have been able to spend 15 hours but I ended up going fishing Saturday and then watching Lsu get stomped Sunday.
This post was edited on 9/4/23 at 4:40 pm

Posted on 9/4/23 at 5:20 pm to Timmayy
Project is looking really good. You should be very proud of the job you have done.
Posted on 9/4/23 at 5:49 pm to highcotton2
I appreciate it. Truthfully I think it’s too early to be claiming any victories but I am happy with how it looks as of now. I’m honestly ready for once all these fillets seams and holes ar e filled so I can sand it back down and make it look a little better than it does. Getting closer and closer to glass
Posted on 9/5/23 at 8:02 am to highcotton2
quote:
Project is looking really good. You should be very proud of the job you have done.
I totally agree. Awesome project and thanks for sharing it here. For us that know absolutely nothing about what is involved and who have been in a boat their entire life, its a great learning and eye opening experience seeing it happen

 Page 6 of 11

Popular
Back to top